Complex Damp/Seepage Problem Simple, Long Term, Least Destructive & Low Cost Solution

Complex Damp / Seepage Problem – Simple, Long Term, Least Destructive & Low Cost Solution

How Thermal Imaging Technology, Latest Tools and a trained Home Inspection Team helped in assessing and finding source & solution to serious non-identifiable damp / seepage problem in a reputed Club of Bengal.

Periodical Assessment & Maintenance can save one and all from severe problems caused due to External Moisture / Damp / Seepage Intrusion

History

A renowned club in a key location of Kolkata, India – Heritage Structure

The building was dripping in moisture problems. It had past leakage problems. Though some repairs were carried out still the issues were not properly rectified.  It was both waste of time and money and most importantly having adverse effects on human health and shelf life of the structure.

Why Team MACJ – A Buyers Choice Home Inspections was summoned?

The client was facing the following problems:

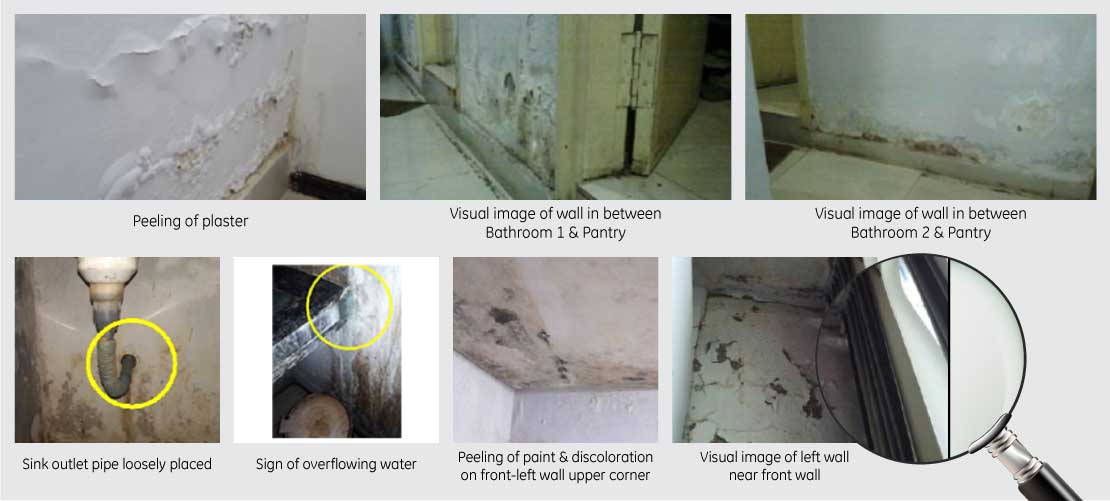
  1. Moisture patches at back wall surface at different levels in the Reception Area.
  2. Moisture patches at front wall right side near external facade plumbing duct position along electrical conduit and discoloration at wall surface.

How lack of maintenance gives rise to issues that become critical in the long turn – Read through…

Observations

Affected Areas along with same wall:

  • Ground Floor – Reception area
  • Mezzanine Floor – Kids play room
  • First Floor – Conference Room
  • Roof / Parapet Wall

Roof Parapet Wall

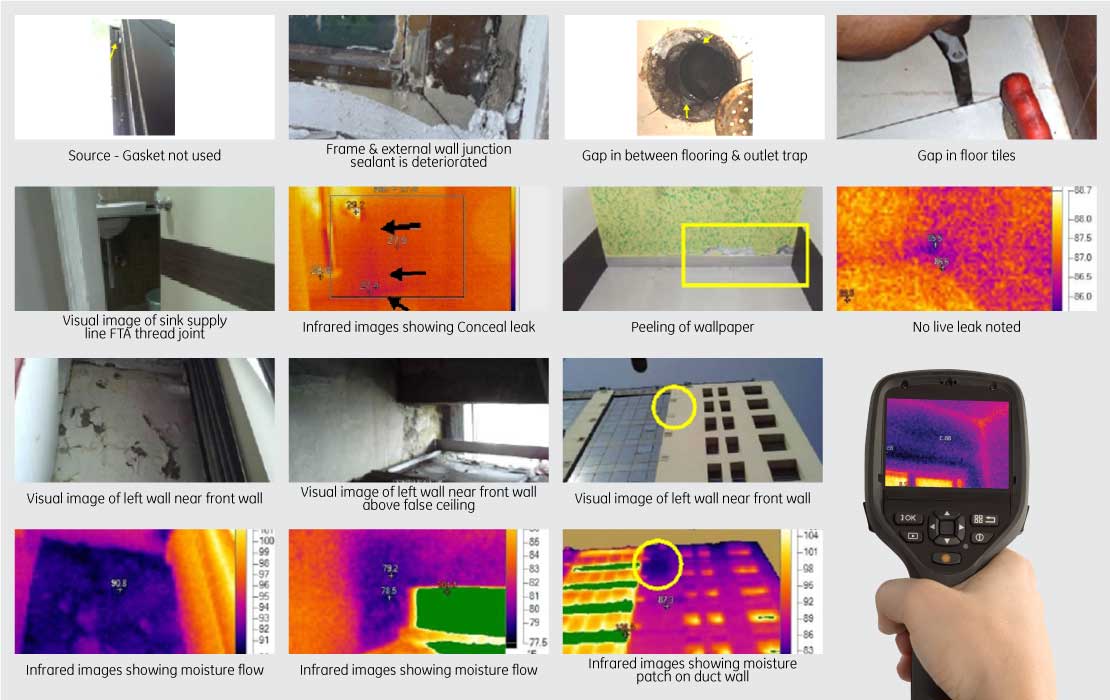
  1. Presence of moisture at parapet wall on right side of plumbing duct above curved chajja projection. As confirmed by IR images, water intruding from rain water outlet concealed along the parapet wall.
  2. Gaps and deteriorated plaster of parapet wall lower portion at skirting level, around plumbing duct and around plumbing pipes clamped or concealed at parapet walls / skirting junction.
  3. Minor cracks with weathering effects noted at parapet wall flashing, external surface and at plumbing duct projected wall surface with parapet wall junction.

Roof Flooring

  1. Gaps at tiled flooring noted at places effecting parapet wall lower portion.

Roof Plumbing

  1. Inadequate grouting / bore packing and no grating at rain water outlets.

External Facade
Facade Condition:

  1. IR images showed presence of moisture at external wall above reception area entrance door and around DB panel. The wall surfaces are affected by moisture infiltrating from #1- Roof- Parapet wall, #2- External facade – Plumbing duct, #3- Cracks at wall surface.
  2. Inadequate finishing and slope at curved chajja below roof level, which was leading to moisture intrusion along wall surface junction.
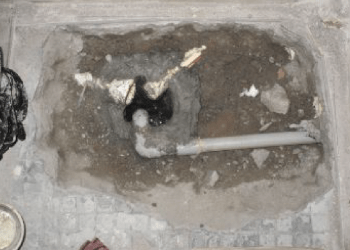
Plumbing Duct

  • Leakage noted at water supply pipe mid junction in plumbing duct, causing infiltration of water along the deteriorated wall surface.
  • Plaster condition at plumbing duct wall surface at places with algae formation and bare brick works, open sleeve for plumbing pipes and other conduit insertions also been noted. Moisture intruding from roof level till ground floor level along duct positions damaging either side of wall surface.
  • Electrical pipes not dressed at plumbing duct with bare plaster packing, causing moisture infiltration at either side of wall surface mentioned in Kids Playroom – Wall section. As noted AC drainage pipe terminated at duct wall surface right above electrical conduit insertions on right corner of duct and plant growth noted, from where moisture intrusion taking place during AC operation and rainy season.

Tracking the Source

  1. Roof – Rain water outlet & Parapet wall condition.
  2. Conditions of external plumbing duct.

The entire building was mostly affected from the roof:

Simple & Low Cost Solutions – Before anything and everything, the source needs to be repaired

The step wise rectification methodology is as follows:

Step 1: Roof – Parapet wall, Plumbing and Flooring to be taken care.
Step 2: Plumbing duct rectification.
Step 3: Internal wall and External wall rectification.

Main Essence – The main essence of any moisture problem is tracking the source. You not only need any engineer but an engineer who is a Home Inspector and has expertise in this particular field. Also the use of advanced tools & technology play a pivotal role in these types of inspection.

In this case we got to know that intrusion of external moisture was mainly from plumbing duct and above roof rain water outlet with cracks at external wall surface.

Also property maintenance is very important.  If periodical maintenance or health check-up of any property is not carried out or problems are overlooked, then deterioration will occur and the issues will spread. It will adversely affect both the human health and property life. Taking care of the elements of any property will not only ensure smooth functioning but will also provide those elements a longer and healthy life.

To know more, please read through our related Blog:

www.macj-abuyerschoice.com/damp-seepage-assessment-with-solutions-through-thermal-imaging-technology

MACJ – A Buyer’s Choice Home Inspections
Inspected Once – Inspected Right
Long Term Solution – Low Cost of Repair – Least Destruction
We ensure Long, Safe& Healthy Life of your Dream Homes

Thermal Imaging & Trained Team helps in assessing, finding source & solution to serious damp/seepage problem in an operating Commercial Complex

Thermal Imaging & Trained Team helps in assessing, finding source & solution to serious damp / seepage problem in an operating Commercial Complex

Thermal Imaging Technology, Latest Tools and Trained Team helps in assessing and finding source & solution to serious damp / seepage problem in an operating Shopping Mall cum Office Complex

The Serious Problem of Damp / Seepage - Moisture Intrusion

Operating Shopping Mall cum Office Complex in a key location of Kolkata, India.

The complex was facing severe damp problems. The maintenance team got multiple repairs and also the water proofing treatment done which lasted for some time but problems reappeared. It was both waste of time and money and most importantly having adverse effects on human health and the shelf life of the structure.

Being a running shopping complex / office space it was not prudent to shut it down for rectification for long duration – What was required was a quick as well as accurate & long term solution.

Fortunately they found MACJ – A Buyer’s Choice Home Inspections when they were searching the web and in the MACJ website they saw how, through infrared technology, tools and trained team, MACJ – A Buyer’s Choice Home Inspections is able to track and find the source of hidden damp / seepage intrusion with long term solutions.

Team MACJ was summoned to assess and find a long lasting solution.

We shall describe a particular office space that was affected in multiple areas due to moisture / damp from multiple sources.

Observations

The moisture / damp / damage had spread in different areas as mentioned below:

  • High moisture content, Damp, Peeling of plaster noted on window sill & popping up paint under the window in the Conference Room along the entire front wall.
  • Popping up of paint, Stains and Moisture presence noted In the Bathroom Alley walls,
  • Moisture and mold noted in Bathroom 1,
  • Moisture and leak stains noted in Pantry,
  • Moisture noted along the joints of floor tiles in Bathroom 2.

Tracking the Source and Reasons of the Problems through
Thermal Imaging Technology and Trained Team

  • In the conference room – Gaskets were not provided at window glass and the window opening junctions had deteriorated sealants;
  • Bathroom 1 – Major leakage in plumbing duct – Duct was enclosed and inaccessible; as seen by infrared camera moisture flow seen along the duct walls;
  • Pantry – Leak at outlet and water presence at the counter directly affecting the walls;
  • Bathroom 2 – Affecting walls of adjoining office due to Improper grouting at floor outlet and Gaps noted on wall & floor tiles joints;
  • Bathrooms /Pantry Alley  –  Walls affected by multiple reasons  –
    • Conceal drain pipe of AC
    • Moisture from the bathroom 1 wall
    • Seepage from Pantry
    • All along the lower portions due to seepage from tiled floors and inadequate plaster work

Simple & Low Cost Solutions

Before anything and everything, the source needs to repaired

  1. Conference room
    • Installation of suitable gasket in glass panel;
    • Window Gaps – Sealing with exterior grade silicone sealant in dry condition as per manufacturer specification;
  2. Bathroom 1
    • Plumbing duct leak to be repaired;
    • Floor outlet to be grouted by non–shrink grout;
    • Gaps to be sealed by silicone sealant;
  3. Pantry
    • Plumbing leak to be repaired;
    • Counter junction to be sealed with adequate sealant;
  4. Bathroom 2
    • Floor outlet to be grouted by non–shrink grout;
    • Gaps to be sealed by silicone sealant;
  5. Bathroom / Pantry Alley
    • AC drain pipe elbow to be reinstalled;
    • Plumbing duct to be repaired;
    • Plumbing repairs to be done;
    • Gaps to be sealed
  6. Plaster to be chipped off and affected areas to be left for drying, re- plastering, curing and paint finish;

Crux of the Matter

The moisture detected was both due to internal and external intrusion of damp / seepage in the building. The wet areas were primarily affected due to workmanship and plumbing work. The other areas affected due to improper installation of AC and external openings not made water tight.

In this case we got to know that intrusion of internal moisture was mainly from plumbing defects in wet areas i.e.bathroom, pantry and external duct and some other issues like junction gap in bathroom tile, door frame, floor tiles. All these things contribute to moisture intrusion.  Workmanship is a very crucial factor in construction.

First and foremost, the source of moisture / damp / seepage has to be identified, then rectified in proper way and sequence and then the affected areas need to be rectified.  And all this can only be done with the help of state of the art technology, tools and trained team. MACJ excels in this sphere of work – it was only a matter of time that the source was identified and long term solutions determined.

Also property maintenance is very important.  If periodical maintenance or health check-up of any property is not carried out or problems are overlooked, then deterioration will occur and the issues will spread. It will adversely affect both the human health and property life. Taking care of the elements of any property will not only ensure smooth functioning but will also provide those elements a longer and healthy life.

To know more, please read through our related Blog:

https://macj-abuyerschoice.com/damp-seepage-assessment-with-solutions-through-thermal-imaging-technology/

MACJ – A Buyer’s Choice Home Inspections
Inspected Once – Inspected Right
Long Term Solution – Low Cost of Repair – Least Destruction
We ensure Long, Safe& Healthy Life of your Dream Homes

Case of persisting damp / seepage issues even after Refurbishing and Rectification work in a Duplex Home

Case of persisting damp / seepage issues even after Refurbishing and Rectification work in a Duplex Home

The Background

A duplex in a premier residential complex.

  • Refurbishing / rectification jobs and re-painting done recently to repair damp walls / seepage problem.
  • Source of Damp / Seepage not identified.
  • Problem resurfaces

This is where Team – MACJ – A Buyers Choice Home Inspections, came into picture.

The main concerned area was the Dining Hall.

It was badly affected. There were:

a) Paint discolouration on right wall lower portion around switch socket board.
b) Paint discolouration on right wall lower portion at mid span.

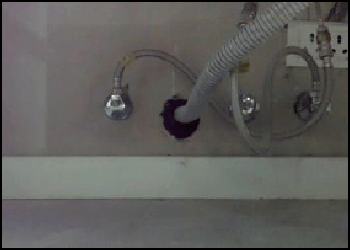
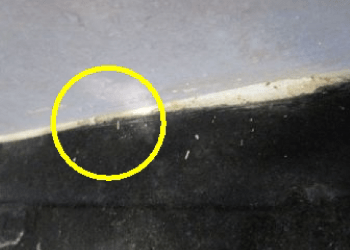
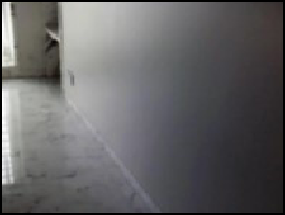
Observation 1 : Visual image of right wall around socket

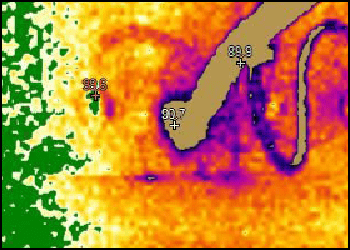
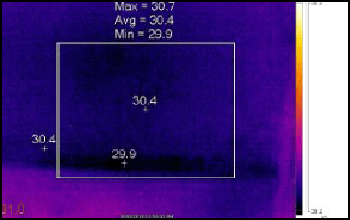
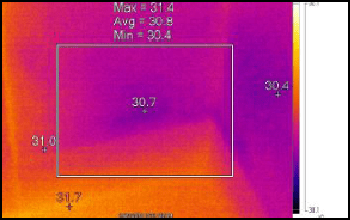
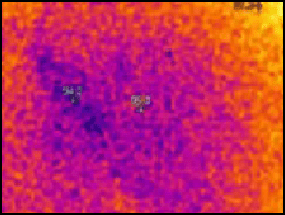
Observation 1 : IR image showing moisture presence

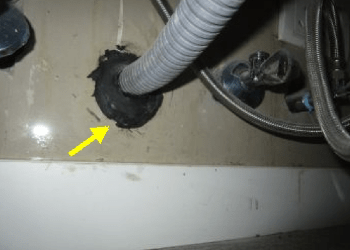
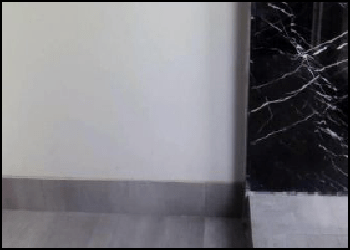
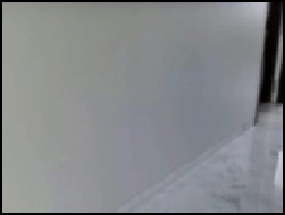
Observation 2 : Visual image of right wall at mid span

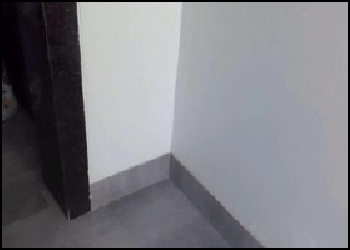
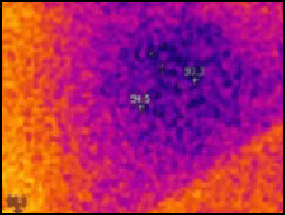
Observation 2 : IR image showing moisture presence

Adjacent Kitchen Wall

  1. The client informed our Team that there had been some past history of leakage around floor drain outlet and rectification works have been done for it. No active leakage was noted.
  2. Minor leak noted around junction of sink flexible drain pipe with outlet pipe on wall.
  3. Dripping water noted on wall surface under counter stone.

Observation 2 : Visual image of sink flexible pipe junction on wall

IR image showing moisture spreading from around outlet position

Observation 3 : Water dripping stains from counter and wall tile junction

Our Team thoroughly inspected and found that there were multiple sources from the adjacent Kitchen Wall side.

As analysed by IR camera, moisture presence noted in the affected area due to intrusions from:

  1. Leak at junction of sink flexible drain pipe with outlet pipe on wall.
  2. From joints between wall tiles and counter stone.
  3. Also gap noted around sink tap.

Multiple sources identified

Floor drain outlet condition

Leakage from sink flexible pipe at outlet joint

Deteriorated sealant at counter stone and wall tile junction

IR images confirmed water running along the surface of the wall which was spreading around the junction, thereby affecting the adjacent right wall of Dining area.

However, there was another source, which was more challenging.

Kitchen Balcony

We observed popping of paint on left wall and back wall lower portion above skirting. As confirmed by IR camera, the area was affected due to leakage from elbow joints of AC drain pipe running concealed along the affected area and spreading to the dining area wall.

Visual image of left wall lower portion

IR image showing moisture presence

Visual image of back wall corner with left wall

IR image showing moisture presence at lower portion

Area of Work Purpose Repair / Renovation Work
Kitchen To stop Leak at junction of sink flexible drain pipe with outlet pipe on wall.
  • Step 1 – Sealant around the junction to be scrapped off.
  • Step 2 – Junction around outlet pipe on wall to be sanded off any loose materials and left for ventilation for entrapped moisture to dry out.
  • Step 3 – Flexible drain pipe to be reinstalled with adequate slope of the end face inside the outlet on wall.
  • Step 4 – Junction around the outlet pipe on wall to be sealed with polysulphide sealant.
Kitchen Rectification at joints between wall tiles and counter stone and at Gap around sink tap.
  • Step 1 – Existing sealant at counter and wall tile junctions and around sink tap to be scrapped off.
  • Step 2 – Junctions between counter stone and wall surface and around sink tap to be cleaned of any loose materials.
  • Step 3 – Adequate packing under sink tap to be done with polysulphide sealant.
  • Step 4 – Junctions to be sealed with epoxy based stone grout of matching colour pigment.
Kitchen Balcony To rectify AC drain pipe
  • Step 1 – Sanding around the affected area till plaster surface and chase cutting to be done along the AC drain pipe at conceal around the affected Area.
  • Step 2 – Drain pipe to be checked for any damage and leakage.
  • Step 2.1 – If found damaged, then damaged pipe to be replaced with new agricultural pipe.
  • Step 3 – Drain pipes to be reinstalled with proper solvent joints at elbow positions.
  • Step 4 – Adequate ventilation to be provided around the affected area for the entrapped moisture to dry out.
  • Step 5 – Smooth surface finish with mesh tape and repair mortar to be provided.
  • Step 6 – Paint finish as per paint manufacturer specification.

This case study establishes that localised / surface rectifications are not enough to solve a damp / seepage problem. It is important to find the source of the problem. It requires state of the art tools and expert knowledge (of Professional Home Inspectors) to accurately identify the issue and the source of damp/ leakage/ seepage. Experts are needed not only for identification purposes but also to provide the best pocket friendly solutions for the issues. Trust our experts to give you a long term solutions to your problems.

If only our client engaged us in the first place, then he / she would not have to shell down big amounts.

MACJ – A Buyer’s Choice Homes Inspections Motto:
LLL – Long term solution – Low cost of Repair – Least destruction

Also read our related Blog: https://macj-abuyerschoice.com/real-estate/are-you-renovating-or-remodelling-your-home-or-giving-it-a-makeover-home-inspection-before-renovation-heres-some-food-for-thought/

Case of the Monstrous Moisture – Mystery of Moisture (Damp / Seepage) Laden Building

The Background

Moisture Laden Heritage Building (Façade + Ground + 3 Floors + Roof)

Planning for Home Renovation

  • Old Heritage Type Building
  • Major Investment approx Rs. 12 – 15 lacs
  • Source of Damp / Seepage not identified

It made sense to do a thorough Damp / Seepage Inspection through Thermal Imaging – Infrared Technology

The entire western side of the building (all floors) had significant moisture / damp damage

  • Ground Floor: Walls of bathroom had stains and musty smell due to build up of moisture. Besides the visible stains the infrared image of wood panel inside the bathroom showed moisture seeping in.
  • First Floor: Walls of bathroom had moisture presence. Ceiling of Bathroom had cracks.
  • Second Floor: Walls of bathroom-1 had crack above the window indicating deterioration of the wall due to presence of moisture. Ceiling of Bathroom-1 had Fungal deposit. Walls of bathroom-2 had Hole in the wall and external clamps and peeling of paint was also noted which indicated moisture presence.
  • Third Floor: Besides visually noted, water intrusion was also seen by the infrared measurement at all the walls along the West and North end rooms and bathrooms.
  • Roof: Major Damage and Issues Observed – Significant amounts of debris, Constant flow of water noted under the water tanks and near drainage pipes, Cracks, Uneven finishing, Hollow masonry structure.

Severity of the damage increased as we went on higher floors (Western side of the building)

Source Identification

After a thorough check up of the said areas, we reached the roof. And Voila! We found the source:

Roofs, parapets and other exposed parts of a building are most susceptible to rain penetration, especially where access for maintenance is difficult. Junctions in roofs are potential trouble. Hairline cracks in pointing and render invariably admit moisture.

  • Significant amounts of debris were noted near lift machine room (LMR) where rain water was found stagnated and understood to penetrate the weak areas in the parapet walls.
  • Cracked and unevenly finished Wall – floor junction huller was noted under the water tank and at the southern end circular projection.
  • Beside the tank, the hollow masonry structure was acting as unwanted water storage / pocket. Live and green plant showed presence of significant amount of moisture.
  • Constant flow of water was noted under the water tanks and near drainage pipes. Normal cement slab should not be subject to stagnant water. There was also a gap between CI drain pipe and slab, which indicated that water was flowing into the masonry wall then into the drain pipe. And as masonry wall is an absorbent, hence it was absorbing the water and passing the same into the wall below and spreading across the periphery.

Proposed Solution

Step Area of Work Function Purpose Repair / Renovation Work
1 Water tanks and tap at the roof Plumbing To Stop Constant flow of water noted under the water tanks and near drainage pipes Install automatic over flow sensors at water tanks (to be done by professional vendor). The dripping tap to be repaired.
2 Drain Pipe & Slab at the Roof Plumbing To stop the water from entering into the parapet wall at the rain water drainage Short piece of PVC pipe to be fixed inside gutter, so that flow of water would be: Roof > PVC pipe > vertical CI pipe.
3 Entire roof drainage lines Plumbing To stop the water from entering into the parapet wall at the rain water drainage Broken CI over flow line to be replaced and connected directly to the vertical CI pipe.
4 Below LMR room Plumbing To check water stagnation at LMR From the slab below LMR, all materials to be removed, slab to be cleaned and repaired for proper drainage.
5 Parapet wall Civil To check the damage due to growth of green plants, moss and algae at the structure All growth at the parapet wall to be completely removed and treated with light acid.
6 Wherever applicable Civil To stop soaking of water and developing pockets of water at the bare and hollow brick work Hollow brickwork to be completely re-plastered with Cement – sand (1:4) mortar with Latex additive and given neat cement finishing. Or It should be filled with brick concrete and re-plastered as above.
7 Roof Civil To stop rain water infiltration from cracks at the roof and parapet wall and the ones developed on removing the plants Surface preparation / Cleaning – All loose material, dust, debris, oil paint, grease etc. to be completely removed with wire brush.
Pre wet the surface with water and allow it dry slightly. As applicable, Cement – sand (1:4) mortar with Latex additive or masonry silicone sealant to be filled and compacted into the cracks. No moisture should be in the crack during filling.
8 Slab and roof junction Civil To make a seamless junction, as Huller at the slab and roof junction is not adequate, After surface hacking and thorough cleaning with wire brush, 3 inch X 3 inch wall and roof junction fillet to be made on the entire Roof and wall junction.
9 After completion of the aforesaid, affected areas to be treated as follows:

  • Affected area paint & putty to be completely scraped of till cement plaster layer.
  • Natural air ventilation to be given in the affected area for minimum 15 days before further finishing.
  • Finishing (including water based paint finishing to be given as per paint manufacturer specification.
  • FYI: The walls to be given ventilation on regular basis.

Conclusion: Identifying the source of moisture is the most important step in these cases and also a very critical one. These inspections involve qualified experienced experts. MACJ – A Buyers Choice Home Inspections is glad to be bestowed with such team who can correctly and precisely identify the issue/s with a simple solution/s. We should also applaud the client who proved wise enough to engage MACJ – A Buyers Choice Home Inspections to solve the problem. Not only did the MACJ team solve it successfully but also saved the client from major future damages which would have also resulted in incurring a lot of money. Our recommendations were also pocket friendly.

Renovation Parameters Before MACJ Inspection Renovation after inspection By MACJ – A Buyer’s Choice
Short term solution as source not identifiable Long term solution as the source of seepage identified
Damage to the Structure Mostly Non-destructive solution
High Cost of Repair / Renovation – Rs. 12 – 15 lacs Low Cost of Repair / Renovation – Rs. 4 – 5 lacs

MACJ – A Buyer’s Choice Homes Inspections Motto:
LLL – Long term solution – Low cost of Repair – Least destruction

Classic case of mystery water seepage from a false ceiling having a non-identifiable source

Waterproofing / Other Vendors’ Solution
Before MACJ – A Buyer’s Choice Team Inspection
Short term solution as source not identifiable
Damage to ceiling / upper floor
Repair time: 20 – 25 days
High Cost of repair – Rs.1,50,000.

How MACJ – A Buyer’s Choice team solves this with a minimum of fuss & cost but maximum of technology, knowledge, & experience.

Description:

Classic case of unidentifiable seepage in a Prayer Room Ceiling that would have resulted in short term solution at high cost of repair with property damage and a lot of time. MACJ – A Buyers Choice Home Inspections identifies the source and solves the problem with its 3L service philosophy – Long term solution – Low cost of Repair – Least destruction

Background:

MACJ – A Buyer’s Choice team observed the following on visiting client’s home (5th Floor Unit):

5th Floor:
Water droplets falling from the Prayer room ceiling approximately for the last six months.
Presence of water pocket / trapped water noted in the alcove of the Prayer room as inferred by infrared camera.

6th Floor:
As the water was coming from the ceiling of 5th floor, so it was expected that the source of water was at the floor above (6th Floor) where it had made the path from the left corner above the alcove ceiling. Also at the left side of the sixth floor wall, minor efflorescence was noted which indicated presence of soluble salts and moisture. The 6th floor had a Prayer Room directly above, an open balcony with plants, a window ledge and a bathroom at a distance surrounding it. The source could be from anywhere.

The water path on the floor indicating leak in the concealed drain pipe

Possible Alternatives:

MACJ team did thermal (infrared) scanning of the area to track the water path and possible source of the leak. It was noted at 6th floor, an Air conditioner (Split AC) was installed on right side which had water drainage. The Drain line was a long concealed pipe running across the marble floor from right side to left side where the air conditioner drainage had been given in the balcony. Only the starting and end points were visible.

Apparently the Air conditioner pipe in 6th Floor either had a leak or an improper joint from where the air conditioner water was leaking.

Alternative Non-Destructive Testing (NDT) – Substantiation:

MACJ carried out NDT along with Deductive reasoning for making sure that the leak was from AC drain pipe. The team decided to pour 1.5 L of water in the starting point of the drain pipe and observed the ‘said end point’ for 15 minutes. But less than 500 ml water came out.

Eureka! Within that time frame, fall of water droplet in the affected area had increased. Hence more water was reaching the area due to leak/ improper joint at the drain pipe.

To substantiate our findings on Monday (15th may) we made alternate connection at the waste water drain pipe of the air conditioner at the sixth floor prayer room and requested our client i.e. the home owner to operate the air conditioner normally. 5th Floor: At fifth floor on the third day i.e. Wednesday (17th may) we observed the falling droplets reduced to bare minimum.
By Friday (19th may), as confirmed by our client the falling of water droplets had completely stopped.
On Saturday (20th may) it was reconfirmed that the droplets had stopped and the ceiling had reduced moisture.
6th Floor: On Saturday (20th may) we re-connected the waste water drain pipe of the air conditioner the way it was connected before.
5th Floor: By Monday (22nd May) water droplets started falling again. This reconfirmed that there was leak at the existing waste water pipeline of the sixth floor prayer room air conditioner.

Recommendations

Most of the current drain pipe was concealed under the finished wall and floor; hence it was not practical to replace that pipe. From a practical and economical point of view, we recommended to install a new drain pipe towards the room corresponding to the sixth floor air conditioner wall and then placing it towards the duct nearby. We recommended to use ½ inch rigid UPVC / CPVC pipe with company approved sealant only.

Conclusion:

A leak in the Air conditioner drainage pipe gave our client sleepless nights. Thanks to MACJ – A Buyer Choice experts, the issue was correctly and precisely identified with a simple solution. We should also applaud the client who proved wise enough to engage MACJ – A Buyers Choice Home Inspections to solve the problem. Not only did the MACJ team solved it successfully but also saved the client from major future damages which would have also resulted in incurring a lot of money. Our recommendations were also pocket friendly.

Waterproofing Company Solution Before MACJ Inspection MACJ – A Buyer’s Choice Solution after Inspection
Short term solution as source not identifiable Long term solution as the source of leak identified
Damage to ceiling / upper floor Non-destructive solution
Repair time: 20 – 25 days Repair time: 1 day
High Cost of repair – Rs.1,50,000 Low cost of repair – Rs.10,000

MACJ – A Buyer’s Choice Homes Inspections Motto:
LLL – Long term solution – Low cost of Repair – Least destruction