- Essential things that need to be checked prior to Renovation work
1. Leaky Pipes & Faulty Plumbing
2. Signs of Moisture
3. Presence of Cracks
4. Broken or Damaged Tiles
5. Waterproofing of the Terrace
6. Pest / Termite Infestation
7. Sealing all Gaps in Home
8. Electrical & Safety Checkup - Why You Should Get a Home Inspection Before Renovation?
Many homeowners choose to renovate their home or office to give it a whole new look or simply to give more value to their property by enhancing its interior. To improve the home’s value, fix a safety issue, adding a room for fulfilling requirements are other few reasons to renovate home. Depending on an individual homeowner, the reasons may vary.
While a renovation1 may be the best solution for your household, this does not mean it is a task you should take on lightly. Renovating your home can provide your family with the space you need and the beautiful home you want, but it requires careful planning and organization. Before renovating your home or beginning any work which will alter the structure/element, there are some important things which you must consider.
Before deciding the time and budget to renovate your house, a thorough inspection of all the areas of your home is a must. It would be better to evaluate or understand the existing conditions before renovation. Without knowing it, making changes can create problem and will add an extra cost if any mistakes happen.
Here the essential elements you will need to inspect before you start the exciting part of renovating your home.
Essential things that need to be Checked or Inspected prior to Renovation work

1. Leaky Pipes & Faulty Plumbing
Leaky pipes not only cause damage to your home, but can prove expensive as well in the long run. Faulty plumbing includes loose fittings or improper installation which also will cause leakage problems. You will need to inspect leaky pipes and check plumbing issues before going through the process of renovating your home, otherwise you may have to stop renovation or redo them in order to access the pipes. This can lead to wastage of time & money.

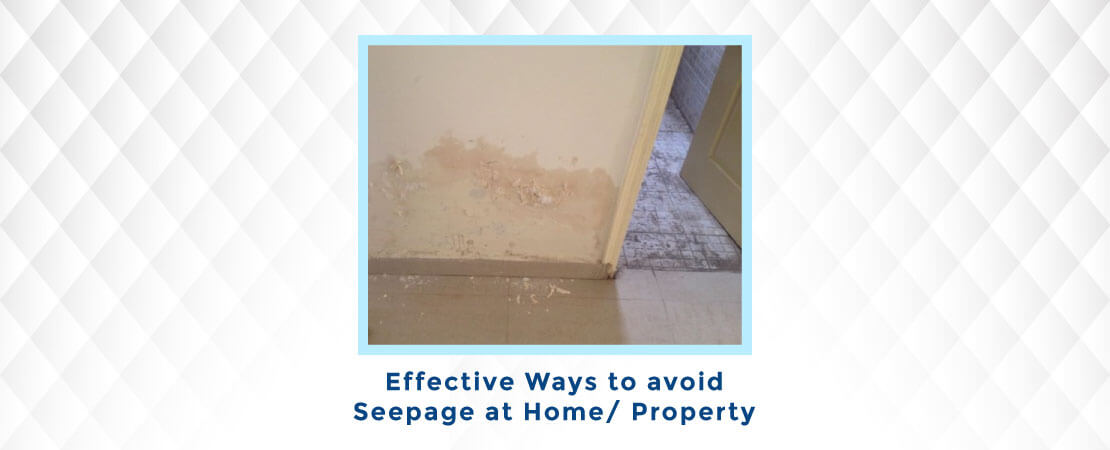
2. Signs of Moisture
For a homeowner, moisture is one of the most common and annoying problems you can face. Moisture / Dampness in buildings is a major factor that contributes to mould growth, unhealthy buildings, and poor indoor air quality. It is one of the most important agents of building deterioration. It is crucial to check out signs of moisture early and also repair them before renovation. Dark patches, peeling off or other paint deterioration, damp and musty odour, visible water stains or discolouration are few signs of moisture for home.

3. Presence of Cracks
Presence of Crack on external or internal wall surfaces may be a sign that there is some problem. An occurrence of the building cracks is often a subject of concern as it can cause further problems like moisture intrusion and weakening the structural integrity of your home if left unnoticed.

4. Broken or Damaged Tiles
Over time, the tiles can become chipped, cracked, broken, or loose. This not only affects the aesthetics of the room but allows moisture to accumulate behind them that will affect the associated areas and add a repair cost.

5. Waterproofing of the Terrace
No matter where you live – in an apartment, a single or multi-storey home, water can cause extensive damage to your home, especially areas that are below the roof in case of damaged waterproofing.

6. Pest / Termite Infestation
If your area already has pests, such as rats, ants or termites etc, then conducting an inspection to find the source before your renovation would be a wise decision. This is because it will uncover any areas of your home that are damaged, prevent further infestation, and stop the spread of it. This is beneficial to check before renovation because you can replace or repair any areas of your home that is causing an infestation.

7. Sealing all Gaps in Home
It is important to check out and seal all unwanted gaps (window frame-wall joints, tile joints, kitchen / bathroom gratings, etc) in homes with proper sealant or grout depending on the requirement and condition. It is important to seal the gaps to avoid moisture intrusion which will result in further damage to the home/property.

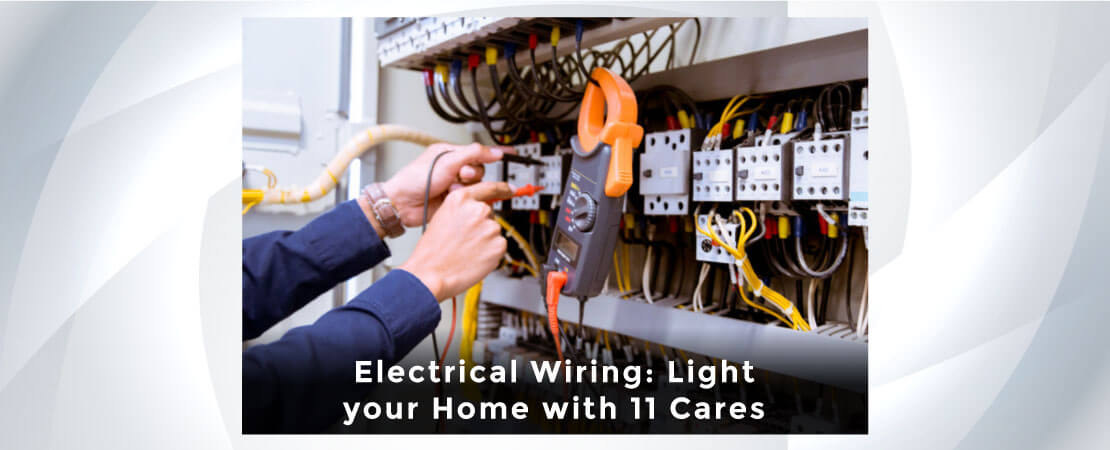
8. Electrical & Safety Checkup
Another important point to consider when renovating the house is checking the electrical wirings: load balancing, wire gauge, uninsulated wires & other related parameter; switch boards; safety concerns due to improper location of electrical outlets etc. Ensuring electrical safety at home is significant before beginning renovation.
To inspect above-mentioned points, it is always better to opt for Home/Property inspection which will provide a report of the current condition of basic elements with related issues along with long term solutions. This will be quite helpful while planning renovation or remodeling work.
Many of us are not aware of the main reasons why Home inspection should be opted for, before renovation. Let’s learn about it:

Why You Should Get a Home Inspection Before Renovation?
A home inspection before the renovation is done to identify any issues before the restoration begins. Renovations are an exciting way to re-decorate your home, but it can also become very challenging which requires proper planning and expert’s advice. Here are some important reasons below:
- Prevents you from Potential problems: Getting a professional home inspection done to look for potential issues and probably prevent it from happening during your renovation is vital. A Home inspection will reveal hidden hazards and issues like safety hazard, concealed leakage, etc. With help of an inspection report, you can prevent future problems and hassles. Without home inspection, you can end up losing time & money and property damage during the home renovation.
- Better Plan for Renovation: When you know about the issues in your existing home, you can then fix and address those issues at the right time. And when you know to fix in the beginning, things get done better, faster, economically and easier. Thereby you can plan better and easily for renovation work.
- Guide the Right way: Home inspection will tell you what needs to be corrected first in your home/property. This will ensure that your money is spent in the right place. After getting repair done, you can get your house renovated in the right way.
- Improves the property value: If you are renovating to sell the house at a good amount, then a home inspection may give you a lot more information than just renovation-related. This will help maximize the value, as you will re-condition your house in a way that will please the potential buyers. A home inspection will improve value by giving buyers peace of mind that comes from knowing the fact that the home they are buying is a safe and healthy home.
Conclusion
A Home inspection Report allows you to get a thorough understanding of the current state of your property, how to proceed if there are faults discovered. Also, Home inspection professionals can guide you about what a renovation will need. It is important to assess the condition of your home with a professional home inspector to determine if there are significant underlying problems that must be addressed before or during your renovation work.
Reference links used:
1. https://en.wikipedia.org/wiki/Renovation